Comic Art
-
Original Comic Art
- Comic Art: Cover 17 items
- Comic Art: Splash Page 27 items
- Comic Art: Double Page Splash 5 items
- Comic Art: Interior Page 287 items
- Comic Art: Double Page Spread 7 items
- Comic Art: Complete Story 10 items
- Comic Art: Comic Strip 101 items
- Comic Art: Unpublished Page 6 items
- Drawings, Sketches, Paintings, etc.
- Prints and Lithographs
- Production Art
- Animation Art
- Wall Art/Posters

|
Original Art from Archie #479 (1999) Complete 6-Page Story 'Guy Magnet' Pencils by Stan Goldberg, Inks by Bob Smith from Archie (1943 Archie Comics) 479 1999 Archie Publications If you ever needed proof of what a decent guy Archie is, look no further than this story! After a modern makeover makes Archie the toast of the ladies of Riverdale, he reverts back to his old look after realizing all the attention is causing problems for his mom. What a guy! Pencil and ink with title/credits stats and text corrections on six pages of Archie Comics art board. Each measures 11 1/2" x 17". |

|
Original Art from Archie's Double Digest #217 (2011) Complete 8-Page Story 'The Mad Cowboy of Riverdale High' Pencils by Jeff Shultz, Inks by Mark McKenna from Archie's Double Digest (1982) 217 2011 Archie Publications A very special entry of Archie featuring Dallas Cowboys tight end Jason Witten! With prom less than 24 hours away, the gang learns that the party they planned to attend was going to feature an uninvited guest- alcohol! Thankfully, Witten's speech to the school helps the students understand the dangers of drink! Pencil and ink on 8 sheets of comic art board, each measures 11" x 17". |

|
Original Art for Betty and Veronica (1987) Issue 147, Complete Story 'Guest Distress' by Dan DeCarlo and Rudy Lapick from Betty and Veronica (1987 1st Series Archie) 147 2000 Archie Publications Original Art for Betty and Veronica (1987) Issue 147, Pages 27-31 "Guest Distress" by Dan DeCarlo and Rudy Lapick. Pencil and ink on Archie Comics Bristol board. 11 1/2" x 17" each, B&W. |

|
Original Art for Bishop War College #5 (2023) Complete Issue by Sean Damien Hill from Bishop War College (2023 Marvel) 5 2023 Marvel The final issue in Bishop's (overdue) spotlight miniseries for the Krakoan age is full of fantastic action pages as Bishop and his team of young mutants in training fend off an assault by Orchis and the Fenris twins in the tunnels below Krakoa. Hill's rich, bold pencil work shines in these original pages- especially in the issue's opening closeup of Bishop being (once again) pulled through time and space against his will. Also included is a copy of the published issue. 21 pages (cover and 20 interior pages) on Marvel Comics art board. Cover is pencil and ink, interior pages are pencil. All measure 11" x 17". NOTE: While the cover art included here is nearly identical, the published cover was drawn by Ken Lashley and Juan Fernandez. The cover art included with this set was drawn by series artist Sean Damien Hill and was not published. |

|
Original Art from First Love Illustrated #77 (1956 Harvey) Complete 6-Page Story 'Too Young to Know!', Pencils by Lee Elias from First Love Illustrated (1949-1963 Harvey) 77 1956 Harvey Original Art from First Love Illustrated #77 (1956 Harvey) Complete 6-Page Story 'Too Young to Know!', Pencils by Lee Elias. The art for this story, first published in First Romance Magazine #8 (1951), is especially interesting as you can see the many, many edits to it that were made to both art and text in the previously published story due to the recently implemented Comics Code! The final panel of the third page has a paste-in edit that's loose enough to see the original underneath where a kiss on the neck was removed! Pencil, ink, and correction fluid on art board. Pages measure 15" x 20". Note: Several paste-in edits, both art and text, are partially detached due to age. |

|
Original Art from First Love Illustrated #90 (1956 Harvey) Complete 6-Page Story 'Choose Well, My Heart!', Artist(s) Uncredited from First Love Illustrated (1949-1963 Harvey) 90 1956 Harvey Original Art from First Love Illustrated #90 (1956 Harvey) Complete 6-Page Story 'Choose Well, My Heart!', Artist(s) Uncredited. A dramatic tale of a woman forced to choose between her poor but loving boyfriend and a rich guy who hit her with his car. Pencil and ink on art board. Pages measure 14" x 19". |

|
Original Art from John Aman Amazing Man #3 (2014) Complete Captain Battle Story Pages 19-24 Pencils & Inks by Steven Butler from John Aman Amazing Man (2014 Gallant Comics) 2B 2014 A thrilling story tracing the origins of Captain Battle that takes place during the American Revolution! Butler's bold linework hops off the page in this tense story that finds an assassin, disguised with the help of a magical coin, make an attempt on the life of George Washington! All pages are signed by Butler in bottom margin. Blue line pencil and ink on 6 sheets of Gallant Comics art board. Each sheet measures 11 1/2" x 18". |

|
Original Art from Sad Sack and Sarge #58 (1966) Complete 5-Page Story 'Spit and Polish' from Sad Sack and the Sarge (1957 Harvey) 58 1966 Harvey It's a shame that Sad Sack isn't around to see Sarge get some comeuppance for his own fashion follies in this five-pager! Pencil and ink on five sheets of art board. Each measures 14 3/4" x 23". NOTE: First page displays some moisture damage to the top of the page, well outside of the art area. |
|
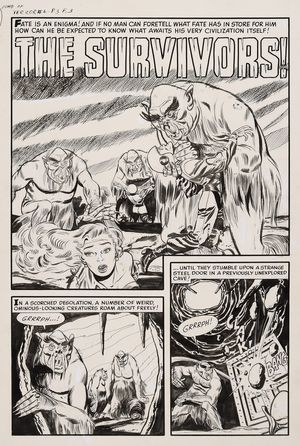
Original Art from Tomb of Terror #6 (1952) Complete 7-Page Story 'The Survivors' Pencils by Joe Certa from Tomb of Terror (1952 Harvey) 6 1952 Harvey A beautifully drawn story set in the post-apocalyptic wasteland formerly known as New York City, now ruled by monstrous beasts! The story opens at a time capsule bunker whose inhabitants are awakened by the intruding monsters. After an initial battle, the humans successfully attempt to communicate with the beasts, discovering that they were once human and begin to formulate a cure. Of course, this doesn't work and the monsters attack again, this time ravaging the remaining human population. As the last remaining human re-seals himself in the bunker, he is accidentally injected with the 'cure' which changes him into one of the monsters in the perfunctory ironic twist. The art is stunning, especially the inks (Grand Comics Database lists John Belfi as the possible inker for this story) in the more gruesome, delightfully pre-code scenes- they really seemed to enjoy seeing the blonde get choked, didn't they? Pencil and ink on 7 sheets of heavy art board, each measures 15" x 22". |
|
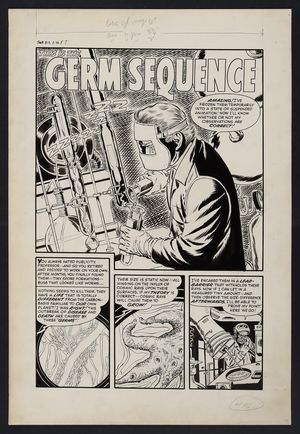
Original Art from Tomb of Terror #13 (1954) Complete 5-Page Story 'This is the Germ Sequence' Pencils by Joe Certa from Tomb of Terror (1952 Harvey) 13A 1954 Harvey As is often the case with science-fiction stories from the Atom Age, the hubris of man causes the central conflict in this dazzling story! With caption boxes written in second person, the story follows a scientist who discovers a dangerous new form of microscopic life borne of the conditions caused by constant war. After failing to destroy them with conventional means, the scientist decides (in an act of hubris!) to simply hop in a time machine and make sure they never evolved in first place. We get some beautiful imagery as he travels back in time on page 3 before he finally lands in 2,000,000 BC and is immediately beset by all manner of beasts including a Tyrannosaurus Rex on page 4, narrowly escaping to the future- where in the customary ironic twist the microscopic beings have grown larger than man and taken over the world! This is an especially well-drawn story with every from the backgrounds and machinery of the lab to the creatures are boldly and intricately depicted. Grand Comics Database notes that John Giunta is the likely inker for this story. Also included is a copy of the published issue. Pencil and ink on 5 pages of heavy art board, each measures 15" x 22". |
